Art Under $100

Wednesday, July 30, 2014

(2 comments)


This past weekend, we went to Toronto to help a friend look for art. He had finished decorating his new condo and the artwork was the last piece of the puzzle. We stopped into a few amazing galleries and started to get a sense of what type of art he was actually drawn to. Chad had a good laugh about one gallery director who stated that the work we were viewing, "insists upon itself." This then became a bit of a running joke as everything from Chad's hamburger to dirty socks "insisted upon themselves". Despite this, it was great to be back in my old stomping grounds, touring galleries minus the free gallery opening wine. 

While we can't all afford art that "insists upon itself", we can all have pieces that speak to us in some way. There are so many great online resources for prints, photography and original work now that there is no excuse to have blank walls. I'm going to start a new feature 'Art under $100', each time bringing you a new theme- let's start this out with one of my favourites- classic black and white art. 

  1. 'Ringside' by Jason Birch. I love the tension in this photograph, it's both playful and absurd. Jason mentions that the foreground figures "come from a 1918 book on practical self-defense. The illustrations in the book all feature gentlemen in suits demonstrating self-defense tactics."
  2. '144 Empty Parking Lots' by Jenny Odell. When photographed from an aerial view these parking lots take on strange abstract shapes. Each print is selection of images cut out from a Google Satellite View.
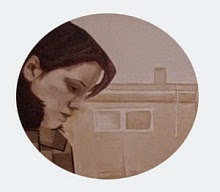
  3. 'Untitled No.12, 2008' from the series Quiet Summer by Caitlin Duennebier. This photo instantly  reminded me a modern version of Andrew Wyeth's 'Christina's World'.
  4. 'Musee de la Chasse' by Laure Joliet. I actually own this poster and it hangs in our office, constantly reminding me that I should have made the trip to see this fantastical place while I was actually in Paris.
  5.  'Flowers Poster' by Debbie Carlos. This is another large scale poster that can fill a wall and has a beautiful grainy texture. You don't even need to pay for framing- hang it with colourful tape or clips.
  6. 'Sandworm 2 Print' by Jamie Derringer. This is just a striking graphic pattern and would be a great standout in a gallery wall. 
  7. 'Particular Space II' by Mary Mackey. Simple, graphic and elegant. Everyone thinks it's easy to create an abstract painting until they actually try it. Another great little piece that compliments every style or stands alone. 
  8. 'Line Drawing 10131224' original drawing by Jamie Derringer. The same artist as no.6 but I can't help but love me some stripes.
  9. Typographical Quote Print by Faye Moorhouse. You knew there would be something about cats in here, right? I mean I'm now a crazy cat lady with three cats. I like the idea of having this beautiful calligraphy in a gallery wall to add interest. 
  10. 'Three Vintage Map Posters' from GeoArtShed. Hanging these as a triptych is an excellent deal if you need to fill a wall space with something other than Ikea. 


Replacement Basement

Wednesday, July 23, 2014

(2 comments)
Do you like my title? Chad made it up for me. I was going to just use "The Basement" or maybe get crazy and use "Basement Update". Anyhow....this is a post about our ugly basement (that's why you've never seen pictures) and how we need to do something about it.

Chad and almost every other guy who comes over thinks the basement is fine like it is.

 "It has a cool bar and wood paneling. It's like a Mad Men basement!'

Yes, and it also has carpets that may have been installed in 1970 (and by installed I mean held together with duct tape). That wood paneling is also not wood paneling, it's faux wood paneling just like the two layers of faux brick and faux wood wallpaper I removed upstairs. It is stuck in a time warp and while I appreciate the retro vibe the dark and damp thing has got to go. Here are the pictures from the real estate listing:


It's beautiful isn't it? I have no idea why they decided to highlight the underside of the bulkheads by painting them red. I also have no idea why there is a cut out in the wall behind the sofa. Maybe there was a faux fireplace in there at one point? It would tie into their love of faux. We haven't done anything in the basement except remove the mini-drapes and rip out the floating side tables. Here it is in its current state:


The laundry area with a mini-drape that escaped my massacre. Please also note the plastic place mat that is masquerading as a backsplash. 


Here's a better look at the mysterious opening behind the sofa. You can also see the same dusty rose that was used throughout the house. At least they stuck to a design vision - faux and pink all the way!


We have a mounted disco ball people!


I feel like you really needed to see the exquisite craftsmanship put into the carpet installation. The grey of the duct tape truly ties the room together. Can we all agree that Chad and everyone who loves the basement is wrong? I mean there is a time and place for a retro basement but if it means that I don't want to be down there and duct tape is holding it together - it needs to go! 

In an ideal world 'we' would replace the faux paneling with drywall or real wood paneling and install a vinyl floor to look something like this:


Jennifer of Rambling Renovators completed her gorgeous basement renovation with DIY whitewashed plank walls and Kamina Oak laminate flooring. Since we don't have the budget at this point, the other option I've decided on  is to remove the carpet, paint the concrete floor and paint the paneling. This could also be an opportunity to create some kind of pattern on the floor. Here was my inspiration:

Left to Right from Top Left: 1, 2, 3, 4, 5, 6, 7

Again, bright and white and fun not dark and damp and retro. I'm not sure if it will be worth it to paint a pattern on the floor as we would probably have to cover a majority of it with area rugs to combat a colder concrete floor but boy do I love the look of a patterned floor. I threw together a quick mock-up of the room with a light grey floor and walls: 


It looks like a normal room and not a basement dungeon or stock image of a suburban mid-century modern basement. Looks like it's time to break out the painting supplies - surprise Chad! 


Le Weekend

Friday, July 18, 2014

(0 comments)


Happy Friday Everyone! We made it! I'm off to a friend's son's birthday party in good old Ottawa this weekend where I've been told to "not have high expectations for drinking as it's a kid's birthday party." Why does this make me seem like a crazy person who's not to be trusted around children? Just because I treat cats like people doesn't mean I don't know not to bring fireworks to a kid's party (note to self: don't bring fireworks). So while I'm at a party full of tiny people who don't drink, why don't you browse a few links:
  1. If you live in the Montreal area, you should go check out Finnegan's Market and report back to me. There is nothing I love more than a good outdoor antique/flea market and this one is right in my backyard. 
  2. I just finished this delightful summer read and I think this one is next on my list. 
  3. After seeing Natalie Joos' photos of Dubrovnik I've added it to my list of places to visit as soon as I have a vacation (sigh). If you haven't read her 'Muse' profiles be sure to take a look while you're there.
  4. Another beautiful blog to drool over, Captain and Gypsy Kid, documents a family living the hippie life in Sydney, Australia.  
  5. SF Girl by Bay featured this amazing new site - the Archivast-  that partners with interesting people to curate limited edition prints of photos from the world's leading archives. 
  6. Great tips from an Antiques Roadshow appraiser for shopping for antiques- use them at Finnegan's Market- or whatever your local haunt is.
  7. Mandi from Making Nice in the Midwest has been killing it with her DIY projects for A Beautiful Mess. She rounds them up here
  8. These vase portraits by Maya Gohill are just stunning. Her satirical portraits are also pretty great. 
  9. When I still had cable I use to get sucked into The Steven and Chris Show all the time. I just found out they recap all their decor segments on their website. Here a great bit on elevating your space with texture


Design*Sponge- 20 Before & Afters

Thursday, July 17, 2014

(0 comments)


If you didn't see it before, now's your chance. Design*Sponge has done a round up of 20 Before + Afters That Will Make Your Jaw Drop and included our House Tour. Thanks guys, you're the best!


Even if you're completely bored with looking at our Before + Afters at this point, there are still 19 others that showcase amazing makeovers. If you still think you could stand to look at our house, I've finally added a House Tour link in the sidebar so you can see the current state of all our projects.


Closet Room Makeover

Monday, July 14, 2014

(2 comments)
When you live in a house built in the 1950's you have to expect that you aren't going to get a walk-in closet. Our 'master' bedroom is really only built to house a double bed and the closet is so small that only Chad's things fit in there comfortably. I imagine in the 50's when you only had 5 or 6 outfits a couple's things would have had more than enough room...but 5 or 6 outfits I do not have! The second bedroom upstairs is really tiny and when we toured the house it had a single bed, a dresser and a chair.


I immediately started to think about my dream closet scenario, the one where I dedicate an entire room to my clothes, a real walk in closet- a dressing room- where I could twirl around in dresses, plan my outfits for the next day and never leave piles of clothes on the floor again. Here was my inspiration:

Clockwise from top: 1, 2, 3, 4, 5
Obviously my original inspiration was to have Chad install an Ikea wardrobe on one side of the room and mount a hanging rod under the sloped roof exactly like in the first picture. Unfortunately, those wardrobes are not cheap and Chad's willingness to continually build and/or install things also has it's limits. The good news is it may get done in the future (right Chad?) but for now I think it's working just fine. Another plus is that if we ever move it can be easily turned back into a bedroom. 

I'll skip showing you the in-between phase - where my clothes got covered in renovation dust and it became the room where unused furniture went to die. I rushed to finish up the room before the photo shoot a few weeks ago because it was definitely not photo worthy. In order to stretch the budget, I re-used paint from other projects around the house, re-used some hand-me-down and flea market furniture and scored some great things on super sale at Target and West Elm. 


In order to play up the sloped back wall and add some interest, I painted a half wall using paint left over from the bedroom. The top half of the wall and ceiling are both painted white (even if it looks a bit blue in the photos). I found the rug on sale at West Elm and in a happy little accident, it perfectly matched the wall colour. From there I added a few touches of black through the chandelier, hooks and dresser knobs to tie into the black clothes racks I already had. The bench was my best deal at only $30 and doubles as a much fought over cat bed. I used a mirror and dresser that my sister had left me and made sure to leave room to highlight the dress mannequin I scored for less than a hundred dollars from the Brimfield Flea Market last year.  Here are the sources or similar options to get the look:
  1. Paint Colour
  2. Bench
  3. Rug
  4. Chandelier
  5. Knobs
  6. Curtains
  7. Mirror
  8. Clothes Racks
  9. Hooks
  10. Boxes (on dresser)
  11. Dress Form/Mannequin (similar) 

Now my clothes feel organised and I actually like going in there. I make an effort to put my clothes away and not let them pile on the floor (we'll see how long that lasts) and I've even spent a little time planning outfits as opposed to grabbing whatever is lying in said pile on the floor. So what about you? Do you have a walk-in closet, a tiny hole in the wall or a whole room devoted to your wardrobe? Let me know how you keep it organised and if making it pretty made it easier for to get ready in the morning.


Real Estate Room Reno

Wednesday, July 9, 2014

(0 comments)
We're back with another installment of 'Real Estate Room Reno,' where I re-do a room from a real estate listing that has potential but isn't living up to it. This time I'm doing a room in a house from my hometown of Ottawa and going back to one my favourite eras - the 60s.


Immaculate and beautifully maintained 3+1 bedroom bungalow situated on a dead-end street in a desirable neighbourhood. This sun-filled and comfortable home features hardwood floors, two gas fireplaces, & more! 

Bedrooms: 3 + 1
Bathrooms: 1 
Year Built: 1967
Asking Price: $474,900


'And more' is right. Now after looking through those pictures can you guess which room I re-did? If you said that amazing living room, you'd be right! I know, I know, the kitchen really needs some love but that living room is so almost there. If this were my house, I would probably open up the whole kitchen and create an open floor plan with an island. I would also carry the hardwood into the kitchen and refinish the floors to be a tiny bit darker. 


I love the white brick fireplace and since brass is having it's moment in the sun again, the fireplace surround can stay. The large windows let in so much light and the floors look like they are in decent shape. I could even almost work with the yellow curtains and that metal art above the fireplace. For this room though, I wanted to try something a little different for me, something fairly neutral and organic. Here were my inspiration pictures...

Via
Via
Via
Via
Via
So one more time - the before:


and the 'Real Estate Room Reno' after:


While I normally gravitate towards bright colour and lots of pattern, I'm really loving this room. It's calm and inviting but also looks collected and modern. If you'd like to recreate your very own "organic mod" living room, here are the sources:
  1. Collection of African baskets
  2. Brass table lamp
  3. Console table
  4. Wooden side table
  5. Pair of armchairs
  6. Jute rug
  7. Walnut coffee table
  8. Brass side table
  9. Black metal and brass floor lamp
  10. Linen drapes
  11. Sofa
  12. Velvet lumbar pillow

What do you think? Does this help you envision what the room could look like? Do you have a room in your house you'd like help figuring out? Check out my services page so we can start working on creating your very own re-do.


Making a Bar Cart

Monday, July 7, 2014

(0 comments)
I mentioned in my last post a little update I made to the dining room after I moved our citrus tree outside for the summer. Alleged citrus tree since I've never seen it produce any fruit, but let's not blame it because I normally kill every plant - at least it's alive. Here was a view into the dining room before:


The space was looking kind of sad and empty without anything to balance out our display cabinet on the right. So I thought, you know what we need? Another place to store and display liquor because more than anything we need that liquor right at our fingertips should we want it. Lord knows you don't want to be fumbling around looking for booze when it can be right in front of your face at all times. 

There was a small metal table in the basement that the previous owner had left us and it wasn't really being used. 


It had a shape that was almost identical to the Ikea display cabinet. Good job Ikea, by the way, on creating something that actually looks vintage. No one ever guesses it's new. While I liked the shape of the vintage table the colour was kind of blah.


See? So sad! It didn't even match it's knock off brother "Fabrikor". I thought about spray painting it with a Rustoleum metal paint but the colour options (at least at the Home Depot near me) were also kind of sad. Instead, I picked a high quality paint and primer in one, sanded the table, crossed my fingers and then gave it a go with two coats of paint. It worked! So far the paint is sticking and nothing has peeled or chipped off. 

This is the part where I show the 'after' and leave out the part where I was so confident in my colour matching skills that I thought I could match the colour to the other cabinet without bringing paint samples home. Okay, so my tip is - if you're trying to match something, be sure to bring the paint chips home to check. Maybe you're smart enough to do that already so let's just show you the second 'after' (4 coats of paint later):


There it is in all it's glory! That little corner is so much better now. The dining room feels cohesive and I have a place to display all my vintage barware (including the vintage decanter with my initial on it!). I thought I'd show you step-by-step how I styled the bar cart as styling seems to be the final and important step that people always skip when decorating their own homes. 

A few of my favourite must have styling items are all here: artwork, flowers, bowls, boxes (or books) and trays. You can use these items in almost any room- on a tabletop, a sideboard, a coffee table, an entryway table, a bedside table, even a kitchen or bathroom to help make an area look finished. Artwork and flowers are obvious choices but try them in unexpected ways. I hung the art much lower to tie into the vignette below and used a small bronze vessel instead of a larger vase to display a few flowers. Trays are a great way to corral items together - I swear it instantly makes everything look intentional. By using boxes or books to add height you vary the landscape of the items adding interested and inviting the eye to move around. 

Here is my step-by-step assembly of the bar cart:


  1. Artwork by Lindsay Jones
  2. Frame from Ikea
  3. Decanter and Glasses (no longer available from Chapters/Indigo) similar
  4. Teal Tray from West Elm
  5. Kate Spade Straws from Chapters/Indigo
  6. Box from Ikea
  7. Bowl from Ikea
  8. White Metal Tray from Target
  9. Curtains from Ikea
  10. Final paint colour for bar cart Behr 'Famer's Market'

Now let's just relish in the beauty of a fully stocked bar cart that cost me nothing more than two gallons of paint - feel free to stop by for drink.


Brownie All rights reserved © Blog Milk Design - Powered by Blogger