Kitchen Reno Reveal

Thursday, March 9, 2017

(3 comments)
Soooooo.....ummm this is awkward....it's been a while hasn't it? Not to worry I didn't give up completely on design and just crawl under an unembellished rock to die. I'm not going to list my boring excuses...work, finally exercising again, finally cooking again....blah, blah, blah. The point is we've been busy and finally have something to show for it. Guys, we finished our mini kitchen overhaul! All the exclamation points (did you miss all my exclamation points?)!!!!! 


I am completely in love with our new space! It feels a million times better in here and I'm just so darn excited that my vision for the space came to life thanks to our hard work. Mostly Chad's hard work but I did paint every single cabinet myself-totally worth it! The kitchen finally came out of the 90s and now feels modern, classic and clean. The only downside is that it's making some of the other spaces feel very dated (I'm looking at you bathrooms). 

Many months ago I did a post on the kitchen in our new house and what we had done for the time being to spruce it up. I had thrown around idea of painting the cabinets dark green and redoing the floor with a graphic pattern. How closely did I follow my original plan? Pretty close considering we had a tight budget. After testing some paint samples the green was just not working for me. I love the contrast of the black cabinets with the wood and brass knobs. Also a huge thank you to Chad's mom who, while visiting in September, suggested removing the upper cabinets on the back wall to visually lighten the space. It totally changed the space and having the open shelving back there is one of my favourite bits-thanks Paulette! I'll go into more detail on the process because of course I took a million pictures. Here is the before, the during and the AFTER:


Hello fresh new kitchen! Let me tell you, I do not miss that special splatter paint backsplash tile or the chipped laminate countertop. In pictures the floor didn't look that bad but it was scratched and kind of a strange greige colour.  


Ok, now on to the process. Below is where we started when one night I magically convinced Chad that we should just start ripping shit out. Luckily the tile wasn't incredibly secure so didn't damage the drywall too badly when we pulled off the old tile. The kitchen felt more open the minute we pulled those upper cabinets down!


We took off all the cabinet doors, set them up in the garage and used paper cups to support them. I mostly followed the steps outlined in the Young House Love tutorial. I can't recommend the Benjamin Moore Advanced paint enough. It's definitely more expensive but a gallon covered our entire kitchen. It went on beautifully and didn't leave any brush marks. It seems to be holding up quite well.


The butcher block countertop installation was a whole other story. The issue "we" had was trying to cut the corner seam with an uneven back wall. After much swearing and threats of "just having no countertop" we decided to not do an angled seam and simply have two pieces meet at a straight seam as you can see in the picture below. It's not perfect but I think since it's in a hidden corner it's not as noticeable.


In the middle of all of this we also had our windows replaced because they were rotting out and birds had made a home inside the sills. It's nice to have windows that we can actually open now.


Chad's officially a tiling pro now so this was one of the more straightforward parts of the project. We used white subway tile mainly for cost but you also just can't beat the look of clean, classic subway- especially when you have lots of other patterned elements.


For our flooring we went with Vinyl Composition Tile (VCT). We chose this option mainly for its low cost and ease of installation. My dream tile would be a patterned cement tile but we don't exactly have an extra million dollars hanging around. We easily glued this flooring right over our old greige plastic tiles. It allowed us to still create an interesting design and is easily maintained. Lying VCT is also fairly straightforward as long as you don't do it on an angle or make any type of pattern. Obviously, I chose the most complicated option. You can see in the photo below (on the left near the wall) where the floor hadn't been continued and we had to fill with cement to level out the floors. Again I say "we" which means I stood there with a glass of wine and watched. Laying out the majority of the pattern was "easy" it was more difficult to get the corner areas once you had to cut things on irregular angles.


Whew, that makes me tired just remembering...I think that's enough of the process photos. It took us a few months of slowly working on projects during the weekends and weeknights but it was totally worth it.


I re-purposed our old bar cart/table by using up some of the leftover cabinet paint and tucking it in the corner that had been previously unusable due to the french doors taking up all that space. 


We sealed our Ikea wood counters with the sealer that they have at Ikea. We debated using a varnish but in the end I liked the idea of easily being able to touch up the wood with a quick sanding and keeping the natural finish. I love the black sink we got from Costco, it blends in nicely with the cabinets and is easy to care for-no worrying about scratches or marks like I did with stainless steel. 


The opening shelving is made from brackets from good old Ikea and the wood was just planks we picked up from Lowe's. I used a light natural stain on them to match the counters. I wasn't sure about mixing all the metal finishes in the kitchen. Would our silver faucet and stainless steel dishwasher go with the brass knobs I had found at a salvage store? In the end I love how the brass warms up the black. I think it's key to repeat the metals in a few areas so I brought in brass accessories throughout.


Much to Chad's delight I found this cool light fixture at Lowe's and knew I had to change out the multiple black pendants we had for something sleeker and modern.

If you've browsed my Pinterest then you know I was obsessed with having shelving in the dining room. We'd kept the old cabinet there because there was no flooring underneath (thanks old owners). With new flooring in place I could finally have my wall-to-wall shelf. I bought four of these simple Ikea units to create one giant bookcase/shelving unit. I have a lot of stuff, a minimalist I am not, and with no other real bookcase in the house I am thrilled to have a designated place for all my tchotchkes.


I'm loving how the metal legs of the Ikea shelving mirror the metal dining table legs. I also love that I can now constantly rearrange this space. Nothing better then a Friday night with some wine and styling!


So that's it-our new kitchen. I hope you enjoyed getting a glimpse inside our improved space and seeing what some budget friendly updates can do. I've been re-arranging a few of our other spaces so hopefully I'll have time to share these with you soon. 


The New House-Reno Part 1

Saturday, January 23, 2016

(3 comments)

If you've manged to stick around after my months and month of plans about the new house (I was annoying even to myself), I salute you! You'll be happy to know we got possession of the house on November 30th, which is already last year (gulp!) and started immediately to tear it apart. I suppose tear it apart is too strong a word. It wasn't like our last house where we demolished any walls but we did rip up a lot of carpet, remove a hell of a lot of popcorn ceilings and paint every last surface.

For those of you who have scraped a popcorn ceiling you're saying to yourself right now "um mm, yeah dummy it's a huge and messy job that leaves piles of heavy, wet plaster everywhere". If you were me before this started you where saying to yourself "this needs to be done at whatever cost to Chad and his father" because I am a rational person who realizes that popcorn ceilings are a crime against humanity.

Making our kitchen look like a scene from Dexter


Chad and I took a week off work and both our dads came over to help (Chad's amazing dad even flew in all the way from Alberta to help!). We were two teams ready to tackle the 80s back into its rightful place. Camp Zentner (Chad and his dad) were in charge of wetting and scraping every single ceiling in the house, removing all the carpet upstairs, removing all the floor staples and installing the new plywood floors. Camp Brown (my dad and I) were in charge of supervision and stupid questions.


I'm kidding (not really, we Browns do ask a lot of questions and are not super handy). We were in charge of taping all the goddamn plastic up over every goddamn surface in the entire house. 3000 square feet of plastic later, we ensured none of the wet plaster ruined any surfaces. 


While the ceiling popcorn came off fairly easily it really did get everywhere. After it dried it left dust EVERYWHERE. The ceilings are also not perfect. After sanding and patching they are pretty good but I think to make them perfect you'd have to skim coat them or something.  Halfway through the popcorn removal was when I swore it would never end and that the whole house would have wonky ceilings and be plaster and dust covered forever. 

Side note: there is always that moment in the renovation when you swear you made a huge mistake and have taken a perfectly good house and ruined it...usually you do some yelling and then push through with the help of alcohol and it works out!

Team Brown were also the sanders and then the painters. Okay so maybe my dad ended up painting most of our house (thanks dad, you're the best!) but painting every single ceiling was no joke. I swore my neck would be stuck looking up forever. 


You can see below the ceiling in the Master bedroom freshly scraped and painted, just waiting for the carpet to be removed. This was the only neutral carpet upstairs but it was certainly showing some wear and had a few strange stains. I also hate carpet, not as much as popcorn ceilings but they still had to go. We left the carpets in while scraping the ceiling allowing them to act like a huge towel-one less room to give the "Dexter" treatment to.


And then the carpets were gone...but not that ugly wall colour! 


A view in the second bedroom (below) gives you a sense of the beauty of those carpets. Not sure what the thinking was here-yes, let's do red in the bedrooms for a fun pop of colour and to hide all the blood stains... but let's show some restraint and do a nice neutral grey in the hall and then just to change it up-a beige in the master! Design dreams, people. 


Below is the upstairs hallway with the last of the carpets gone but before the beige walls said goodbye.


Here is Chad deep in thought about the plywood floors. We knew we wouldn't have the money to replace the carpet with the same hardwood that runs throughout the house. At approximately $4-$5 a square foot for materials alone, it was going to add up fast. I'd kept Jenny Komenda's "DIY Wide Plank Floors (from Plywood)" tutorial in the back of my mind for a while just waiting to find a time to use it. Chad liked the fact that it ended up being about 80 cents a square foot. 


Here's Chad to tell you a bit about how the process went:

Ok - so this is easy, but tedious and time consuming. Good thing it's cheap! What you do is buy a bunch of cheap-o 3/8" plywood. Then rent a hardwood floor sander and use 20 and 40 grit paper and go to town on each board. We did this in the garage. Once each board is sanded, you will need to rip each board into 8" strips on a table saw. Each strip will then have to have the edges knocked down a little bit with a hand sander. Then it's just a matter of cutting and installing with a nail gun. (Sarah insists that I mention that we made the gaps between planks uniform by using my square as a spacer before nailing). Once the floor is installed, we did a DIY whitewash which is just a 2:1 mixture of water to white paint. Once the whitewash was dry, we protected it with 3 coats of polyurethane. Like I said, tedious but cheap.


Above the master floor completed but not whitewashed. Below, floors done and the beginnings of removing the colour Chad liked to refer to as baby shit. 


The hallway complete before we painted the stairs white.


The other huge project for Chad was removing the ceiling fan from our very high vaulted ceiling, scraping away the dreaded popcorn and creating a very large DIY light fixture. I'll save the details of how he made it for a special Chad post a.k.a. a post full of swearing.


Renting scaffolding was actually not as expensive or scary as I thought. The delivery was the most expensive part and a nice guy came and set it all up. It ended up being around $168 to rent, have delivered and set up for two weeks and then picked up and taken away.


Chad had to install the light fixture in sections, removing a level of scaffolding as he went. 


Yeah! Pretty light fixture for a fraction of the cost I would have shelled out! 

So that's where I'm going to leave you for now. Stay tuned for part two so I can show you the house finished and just waiting for our furniture to arrive. Thanks again to our two awesome dads who probably cursed ever agreeing to help out. At least I know my dad was after he found out there is a real ailment called "dad reno knee syndrome".


Plans for the New House-Floor Plans and Furniture

Thursday, October 8, 2015

(0 comments)

Via
Surprise, we moved in early and this is my new living room! I wish...this stunning room is a sneak peek from Emily Henderson's new book Styled. It is a room designed by another one of my favourite designers-Jessica Helgerson. If someone would like to buy either the book or all the items in this room for me as an early Christmas present it would be much appreciated. I found this on Domaine.com and knew right away it was pretty much everything I'd like in our new space- I mean it already has my hanging fireplace! 

Back to reality... for all of you who asked if we had moved into our new house yet-NO! We don't move in until December. I can see how you would be fooled though. It's not like most people would start making floor plans for a house they won't move into for two months. Also, for those of you interested in the DIY instructions for the lamp/chandelier I talked about in my last post...there are none right now. Chad is working on it and has promised to write out detailed plans if and when the light comes together. Good thing he has two months to figure it out. 

What I've been working on is a floorplan so that I can easily move our furniture in right away without making Chad carry sofas up and down stairs three or four times. Don't worry I have never actually made him do this but let's be honest it isn't above me. Here is my little doodle to show you how the current owner has the main area laid out. I don't know why you would want a huge eat-in kitchen area, a huge dining room and then a super tiny living room but I also don't know how a grown up could live with that red futon.


So here it is! I love my floor planning program because you can easily play around with your furniture to see what will fit where best. I realized right away that our large black leather sectional sofa was not going to fit in either room. Luckily it comes apart in two pieces and we also have a matching leather chair. The black sofa in the "family room" is the chaise section of the sofa and the chair pushed together. I think for the time being it will make a cozy corner near the fireplace. 


The white couch in the living room was my grandparent's couch we had in our old basement. I'll add our marble coffee table in there and the pink chairs are the tub chairs I may or may not reupholster. I happen to have quite a stash of chairs so I could switch them out until I save up enough to get them done. In the kitchen I added a large dining table since there is plenty of room. We don't actually have said large dining table so this is potentially another project to add to Chad's list. I'm also looking for something to put beside the dining table like a buffet or hutch or maybe one of the "fauxdenzas." Other then that, I'll be reusing a lot of our older pieces. The yellow over-dyed rug in the living room will actually be our black and white striped Ikea rug. 

Now to figure out what we're going to do with the kitchen and the floor in the upstairs bedrooms. I think the red carpet was chosen to match that red futon I'm so fond of. Happy Thanksgiving long-weekend and happy floor planning for anyone else knee deep in it! If you're interested in getting some help laying out your living room send me an email or check out my services here.


Plans for the New House-Paint it Black!

Tuesday, September 29, 2015

(1 comments)
We're all settled into my parent's basement. Don't feel too bad for us, it's a walk out and we have it good-free meals, free cleaning and free cat care. The cats are going to be so spoiled by the time we leave. I have been plowing right ahead in my design plans for the new house and started looking into quotes to re-upholster the two swivel tub chairs that had been left for us in the old house. I didn't get too far into that when I realized that upholstery is expensive dammit! I'll share my adventures and potential fabric choices for another post, along with the mind boggling cost. I switched gears and started thinking about what to do with the ugly wooden railings that separate the different levels of our house. In our old house my black feature wall turned out to the thing I loved the most. Lately I feel like it's really been a trend to 'Paint it Black' and for good reason. Black makes a great backdrop and can hide a multitude of sins. Painting the railings black will hide the fact that they don't match the wood floors and be a good temporary solution until I get the glass or metal railings I really want. Just like an all black outfit feels cool, using black in interiors adds that same edge. I love the look of industrial black steel doors and windows but it's just one other thing that isn't in the budget. A great way to get the look without replacing everything is to paint the frames and casing black. I think this could really highlight the huge windows we have as well as tie in the black railings.

via 1, 2, 3, 4, 5&6, 7, 8


Here's a quick Photoshop mock-up of what the two living rooms would look like with black windows and railings. Obviously that dining room light will have to go!


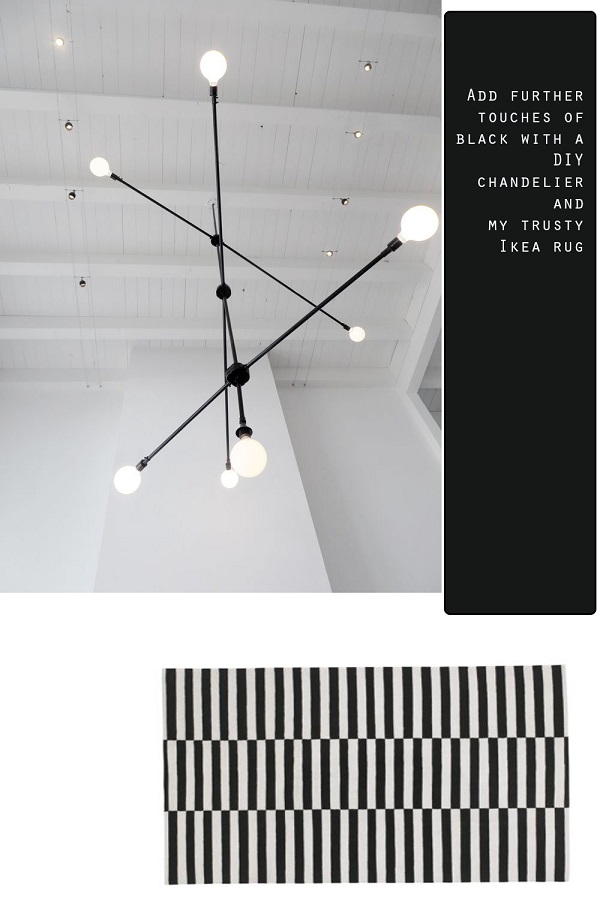
With my black striped rug and the DIY chandelier below, black will tie both spaces together. Chad is super excited for another project- he was just telling me it's been too long since I forced him to figure out some vague demand for a high-quality replica. I've loved this light fixture ever since I saw Lukas Machnik steal the show with it on 'American Dream Builder'. We'll need something pretty large in scale to fill the space above the chimney. You can't see it in the picture but there is currently a ceiling fan way up there.


Obviously I can't just stop with the interior. The exterior currently has two of my most hated colours, beige and brown. I'm okay with green but it's just not working here. My stellar Photoshop skills give you a basic idea of how much better I think it's going look once I paint everything black-goodbye 80s, hello modern! 

What do you think? Do you always try to incorporate a few touches of black or would you take the plunge and go for all over drama?


Brownie All rights reserved © Blog Milk Design - Powered by Blogger